Thierry Geoffroy / COLONEL (b. 1961), is a French artist, living in Copenhagen, Denmark. He is a format artist, developing art formats, working with a wide variety of media including video and instllations. His most known art formats include Emergency Room, Biennalist and Critical Run. The aim is to train the “awareness muscle”. Thierry Geoffroy / COLONEL has published 6 books and his artworks are included in international museum collections. He is Chevalier de l’ordre des Arts et des Lettres. https://www.sabsay.com/thierry-geoffroy-colonel
I like the way Thierry Geoffroy took the close-up picture of the dandelion. The whole pictue is very soft even when it is also very colourful. The background seems to be a bit under-exposed to bring attention to the flower in the centre of the frame. Background and the flower stem is blurred which enhance the focus to the flower even more. Depending lightconditions I would assume that he used a second light source like a flash using diffuser to reduce harsh light and shadows.
Since I was in Austria during lock-down, I was able to take photos outside (following lock-down measures applied in Austria) and inside to create studio-like conditions.
Close-Up and Landscape / Street photography – Dandelions
As dandelions are everywhere I tried to explore different origin places. Typically on the field I captured them out of the town. But I was also eager to document places where you also find dandelions as a companion
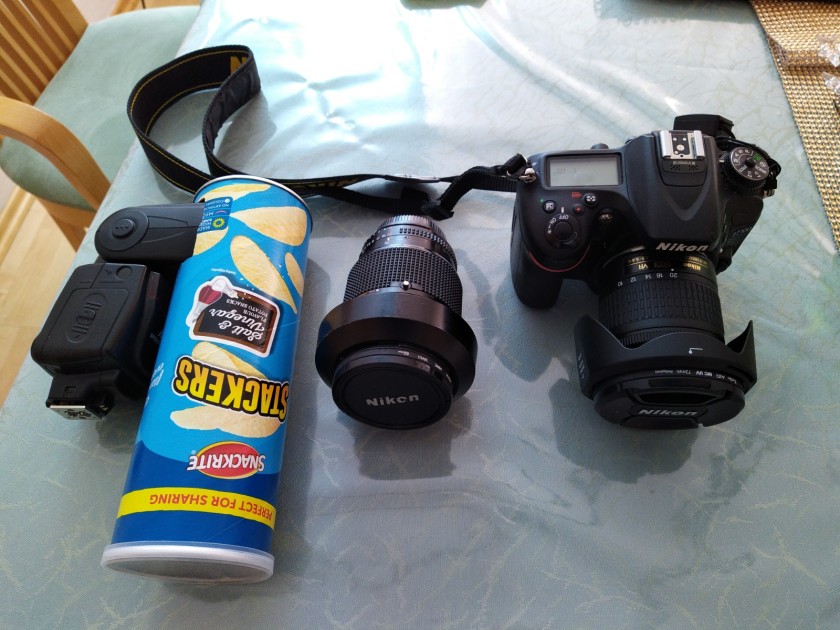
Since I took close-up pictures I mainly used my camera with wide angle lenses between 14 and 35 mm. To be independent with daylight or to the positions to the flower and the sun I also used my flash gun in conjunction with a DIY flash reflector made out of a crisp can.
I was quite satisfied with some of my shoots. Next time I would consider to use a reflector to take advantage of the diffuse natural sun light.
Macro photography is a great playing field for experimental photographers.
The motto of macro photography is: Small really big! The special thing is seeing small things that cannot be seen with the naked eye. With macro photography you can make small things big. …
So technically macro photography is all about the image scale. It describes the size of the image on the sensor in relation to the original size of the photographed object. With the 1:1 image scale, the motif and image on the sensor are the same size. At 1:2 the image is half the size of the original, at 2:1 it is displayed twice as large.
My first approach: Nikon D750 with Nikkor 35-70mm f 2.8 supporting “macro”, flash gun with diy macro reflector
This equipment support macro photography:
In principle, in order to achieve a high imaging scale, it is sufficient to get very close to an object (= close-up photography). However, the usual lenses do not allow this – they can no longer focus at very short distances. I possess and still use an older Nikkor 35-70mm 2.8 lens from analogue times. Although its macro feature is quite limited (it engages at 35mm only) it actually works quite well and I find it quite handy to have some macro ability on hand for emergencies without having to pack extra gear.
Close-up photography – Catkins for Easter
Specific macro lenses can do this (usually up to 1:1) and are also optimized for good imaging quality over short distances. Alternatively, you can use close-up lenses, enlarge lenses with extension rings or bellows and thus make a standard prime lens macro-compatible. Furthermore there are also reverse adapters with which the lens (ideally a slight wide angle) can be placed the other way round on the camera. Simple reverse adapter require manual control but some of them also allow adjustments via camera control, as aperture and focussing, if connected with suitable adapter cables.
With such a solution, image scales of 2:1 or even more can be easily achieved.
Close-up lenses are lenses that are placed on the lens like filters to enable macro photography with normal lenses. The effect is comparable to reading glasses. As with these, the strenght is provided in dioptres. A macro extension tube is matched between the camera body and lens and has the sole function of increasing the distance. The larger distance between the lens and the sensor reduces the minimum focusing distance and the minimum focusing distance. That sounds illogical at first, but it is perfect for us to make small things big! We can still focus on the subject from a short distance. The principle of reverse rings is quite simple: you take a lens and turn it over. … Due to the design of the lens, the focal point is closer to the rear of the lens than to the front. By turning the lens you can now approach the object significantly further.
What role does the sensor play for macro photography?
Which image scale actually is required also depends on the camera. Because the smaller the sensor, the smaller the image scale may be in order to depict the motif in full format. For example, you can put an insect with a size of about 3 cm in scene, this is shown in full format with a magnification of 1:1 – with a cropped sensor only the head may be visible. The smaller the sensor, the lower the required magnification – and the greater the depth of field, which depends on the magnification and the aperture set.
(c) “Praxisbuch Makrofotografie”
In principle, cameras with a cropped sensor are therefore better suited for macro photography, since the depth of field remains greater with a smaller image scale. In practice, however, there are problems with noise, especially with cameras with very small sensors and diffraction effects also occur more quickly at the corners and edges.
Macro shot comparison Nikon D750 vs D7100
To figure out what difference that occurs in practice, I tried to compare both cameras in a direct comparison. Tecnically both Nikon D750 and Nikon D7100 have 24.0 MP resolution sensors but Nikon D750’s sensor is Full frame (35.9 x 24 mm ) and Nikon D7100’s sensor is APS-C (23.5 x 15.6 mm ). Since Nikon D750’s has a larger sensor area with the same resolution, this means that it also has a larger pixel area hence better light collecting capacity for a given aperture compared to Nikon D7100. One other difference between these two cameras that is worth mentioning is that Nikon D7100’s sensor doesn’t have an anti-alias (Low-Pass) filter. Removing anti-alias filter increases the sharpness and level of detail but at the same time, it increases the chance of moire occurring in certain scenes.
used lens for both cameras: Nikon AF 60mm f1/2.8D
The Nikon AF-D 60mm f1:2.8 macro is not the actual lens. But as a traditional lens it works on a broader range of Nikon cameras than any other. Used on a DX camera with cropped sensor it gives an angle of view similar to what a 90mm lens would give on an FX or 35mm film camera.
For this two comparisons I was taking two pictures by each camera with the same lens on a tripod. The position of the two cameras remained always the same on the macro slider to each flower.
Nikon D750 vs Nikon D7100
Shallow depth of field: A too shallow depth of field is always the point with which you have to struggle the most in macro photography. Since it cannot be expanded effectively by stopping down even at large imaging scales (high aperture numbers also lead to a loss of quality due to diffraction in full format).
There are several options to deal with this:
Either creatively, by positioning the object in the focus plane as much as possible or by using lenses which support the tilt function.
Close-up with tilt lens
There is also another technical solution, such as with focus stacking. This involves taking a series of shots in which the focus is shifted slightly from closest focal point of the subject to the lens to the farthest point of the subject so that the focus plane moves across the subject. Such a focus series can be merged with software to form an image with consistent sharpness.
50 Cent Coin
For focal stacking you can either adjust the series of focus points by adjusting the lens or using a macro slider or move the whole camera body toward the object.
Adjusting the lens
Using a macro slider
Results without any post editing.
Adjusting manually the lens from far to closeUsing a macro slider from close to far
Flowers
Flowers and various other rigid objects are particularly popular motifs in macro photography. This is a great place to practice manually focusing and holding your selected objects hands-free. Here, I tried to focus on the rain drop reflecting the rose in the background.
Insects
For animals in motion, photographer may either decide to use a light barrier or – for something larger like flies, bees, butterflies, dragonflies or frogs – simply very patiently by chance.
Occational you may prefer to use macro lenses with longer focal length without a tripod to remain as flexible as possible. This allows you to keep more distance to the subject.
But you may take into consideration of using a very fast shutter speed of a flash because of the high frequency of the wing flap of butterflies.
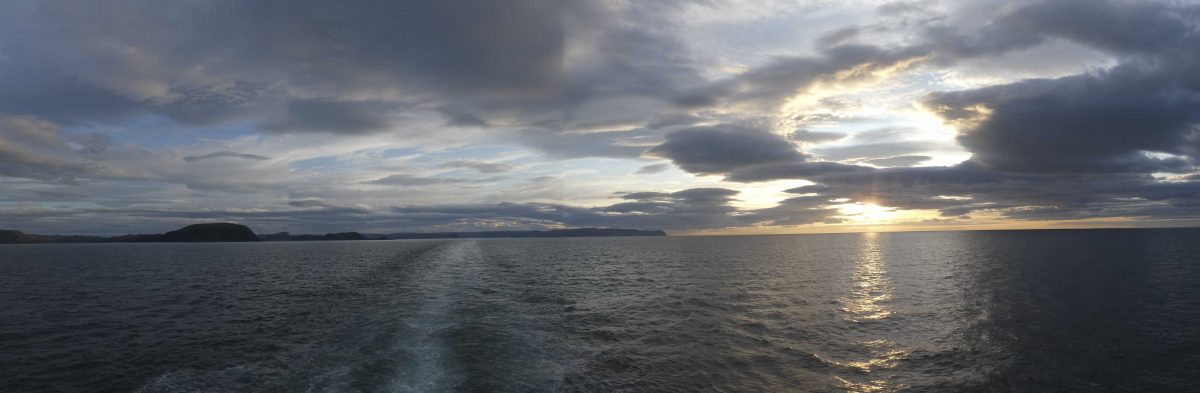
In my understanding, pictures in the dark are also to be seen as a kind of transformation photography bcause the drastical change of the world in appearance and scenery.
FULL MOON ON APRIL 8TH, 2020 AT AUSTRIA
The previous evening the moon reached 356,910 kilometres from Earth. The earth satellite is also called the super moon because the shining moon disk then appears much larger than usual. That’s why I gave it a try to take some night pictures of the moon. To get a better view to it, I went up to the power plant of Oberpullendorf which is located on a hill.
Full moon on the 7th of April behind the power plant of Oberpullendorf
FULLMOON CROSSING POND
A very special full moon was waiting for any amateur astronomers that week: a “pink” super moon shined in the dark sky.
(c) wikipedia.org – Photomontage of shots of the total umbra eclipse of August 28, 2007
Incidentally, the full moon in April is also known as the “Pink Moon”. The name comes from indegene people and was created by observing nature. Actually the full moon is not really coloured pink in April. The Algonkin Native American tribe baptized the full moon in the fourth month of the year after the flame flower (Tropaeolum speciosum). This has pink flowers and blooms exactly this time of year. But to be honest, when the moon raised up over the pond , his colour seemed really a bit bloody 🙂
Blood moon over pond at Stob/Austria on April 8th 2020
In comparisson to the night shoots the day before there was a big disadvantage which I didn’t anticipated before I went out. The pictures from the day before were taken from a higher position toward the horizon. Therefore the moon was by far earlier visible. Unfortunately the pond lays in a valley surounded by little montains toward the east. Therefore the moon came sinificantly later “over the montains” as I stood at a lower position. For the following time lapse I had to stay quite late.
22.04.2020 – LOOKING FOR SHOOTING STARS
Between April 16 and 25, 2020, the lyrids flared up in the night sky. Since the maximum falled on April 22, 2020 on a clear new moon night, the best conditions for observation were available.
Nikon D7100 and Nikon AF 10-20mm DX , f/5.6, 1/8 sec, ISO 2000
According to relevant sources the best observation time was between 10 p.m. and 4 a.m. Then up to 20 shooting stars should be seen per hour. Hmmm.
Nikon D7100 with Nikon AF 10-20mm DX ISO 800, 30sec f/5.6
To be honest it was just by chance that I captured shooting stars during this session. You cannot really anticipate their appearance in terms of precise time and location. So it took a couple of shoots and I wasn’t sure by that time that I really got some on my camera.
NIGHT FISHING
NIGHT SHOTS AT LONDON DURING COVID19
London Parliament with Nikon D750 using Samyang TS 24mmLondon Victoria Station during Lock-downNikon D750 with Sigma 14mm f/1.8 – 1/100 sec, f/1.8, ISO 2000
“First comes thought; then organization of that thought, into ideas and plans; then transformation of those plans into reality. The beginning, as you will observe, is in your imagination.” ~ Napoleon Hill
The purpose of this assingment is to extend the ability to select and visually record from a range of sources in order to communicate information to different audience, using appropriate presentation methods and for a range of specific purposes.
First thoughts about transfomation
My first aproach to this project was quite narrow and minor focused. I was not quite sure on how to comply with it and had no idea in which photography area I should start. But bearing in mind that photo manipulation involves transforming or altering a photograph using various methods and techniques to achieve desired results I got more relexed with it. Some photo manipulations are considered skillful artwork while others are frowned upon as unethical practices, especially when used to deceive the public. During Covid-19 I’d tried to create some “transformed” pictures by taking photos at night, taking macro or close-up pictures or simply by using Photoshop to create different effects from the original photo.
The Camera Raw software is supplied as an additional module within Adobe photography applications such as Bridge, Lightroom or Photoshop (Elements). Raw editing is the comparison of a dark room processing films. With Camera Raw, these applications can import and process raw files from digital cameras which support RAW files. But it also supports of course JPEG and TIF images.
With Camera Raw you can set the colour such as by adjusting white balance, tones and saturation. There are quite a lot of possibilities, accept the ISO which you can’t adjust. Therefore you have to be very cautious about the sensibility before taking the picture. As a matter of fact, as lower the ISO setting as better the result of the image quality. Especially a very high ISO may cause additionally noise which is visibly particularly when shooting at night.
Besides colour adjustments there are further changes and image tools and controls, inter alia such as sharpening, correction of lens errors and retouching.
Further post processing with “Photoshop”
Photoshop is the image editing program from the US software provider Adobe.
The program offers image processing functions for raster (pixel-based) images and vector graphics. It uses a layer-based editing system that enables multi-layer image creation and modification. Photoshop also supports transparencies. The layers can also act as masks or filters and change background colors. Shadows and other effects can also be added to the layers.
Photoshop includes also automation features to reduce the manual execution of repetitive tasks.
First post production using Photoshop
1. Image “Picadilly circus at night”
Nikon D750 with Sigma 14mm f/1.8 – 1/100 sec, f/1.8, ISO 2000
2. Image “Full moon over kew 31.01.2018”
Nikon D7100 with Nikon 18.0-300mm f/3.5-5.6 Camera settings: 300mm, 1/1000 sec, f/5.6, ISO 300
Result
second attempt
Full moon over kew with decending aircraft
Nikon D7100 with Nikkor 18-300mm, Shutter speed 1/125 sec f/11 ISO 160 focal lenght 300mm Post editing cropping,vignetting brightness